Hi lovelies :) I hope you've had an amazing week!
Here is my everyday makeup routine as well as what products I use on a daily basis! I think these are probably my favourite products because I definitely think you should be using the products that make you feel and look your best everyday! Why save it for only special occasions?
Hope you enjoy the video :)
Products used:
- The Balm Shelter, tinted moisturiser. I need to repurchase asap!
- Garnier under eye concealer
- Inglot face powder
- Contouring set by Makeup Forever
- Illamasqua blush in Hussy
- Rimmel eyebrow pencil in dark brown
- Elf eyeshadow primer
- Buck and Sin e/s from Naked Palette
- Maybelline Stiletto liquid eyeliner
- L'oreal Voluminous mascara
- Chanel lipstick in Seduisante
Showing posts with label makeup. Show all posts
Friday, January 17, 2014
Thursday, January 9, 2014
Get Ready with Me! Smoky eye for Beyonce's concert!
I know this is a very late post, but better late than never right? So Queen Bey had a tour in Sydney towards the end of last year and I was lucky enough to go! She is an amazing singer and I absolutely loved her performance of "Halo".
For makeup I wanted to go for a sultry, smoky eye and it was pretty hot that night so I wore a white camisole with a green khaki skirt and my jelly sandals. Here is a pic from my instagram:
Let me know what you guys think of the makeup look!
Products used:
- La roche posay effaclar duo as a base/primer
- Makeupforever body foundation in #34
- Maybelline Pure Mineral Concealer
- Inglot Face Powder
- Jemma Kidd bronzer
- Sleek blush in Rose Gold
- Rimmel eye brow pencil in Dark Brown
- Urban Decay eyeshadow primer
- Stila Smudgestick waterproof liner in black
- Naked palette e/s in darkhorse, smog, buck
- Bobbi brown gel eyeliner
- Maybelline Mega Plush Mascara
- Gorgeous Cosmetics Lipsticks in Rose Velvet
For makeup I wanted to go for a sultry, smoky eye and it was pretty hot that night so I wore a white camisole with a green khaki skirt and my jelly sandals. Here is a pic from my instagram:
Let me know what you guys think of the makeup look!
Products used:
- La roche posay effaclar duo as a base/primer
- Makeupforever body foundation in #34
- Maybelline Pure Mineral Concealer
- Inglot Face Powder
- Jemma Kidd bronzer
- Sleek blush in Rose Gold
- Rimmel eye brow pencil in Dark Brown
- Urban Decay eyeshadow primer
- Stila Smudgestick waterproof liner in black
- Naked palette e/s in darkhorse, smog, buck
- Bobbi brown gel eyeliner
- Maybelline Mega Plush Mascara
- Gorgeous Cosmetics Lipsticks in Rose Velvet
Saturday, September 28, 2013
Get Ready with Me! Natural night time look feat Naked Palette!
So glad the weekend is here!! Sydneysiders are blessed with lots of sunshine today :) I have another get ready with me type of video! I was getting ready for my besties birthday night out and I wanted to go for a natural, casual look. Hope you enjoy watching the video!
Products used:
- Laura Mercier Hydrating Primer
- Makeup Forever Face and Body Foundation #34
- Garnier Roll-on Eye Concealer
- Inglot face powder #66
- Jemma Kidd Bronzer
- Illamasqua blush in Hussy
- Rimmel eyebrow pencil in Dark Brown
- Urban Decay Eyeshadow Primer Potion
- Naked Palette e/s Naked and Buck
- Bobbi Brown gel eyeliner in Black Ink
- Maybelline Mega Plush Mascara
Monday, September 23, 2013
Review! Maybelline Mega Plush mascara
I’ve been wanting to write
and talk about the Maybelline Mega Plus mascara because I am so
impressed with its performance! So today’s review, is really a RAVE
about how awesome the Maybelline Mega Plush mascara is!
What to know:
- I have fairly short, sparse lashes but they are naturally curly. It’s quite hard to find a mascara that works on my lashes!
- I have been using Maybelline Mega Plush mascara for approximately 3-4 weeks
- Purchased at Priceline on sale for $10!
Why do I think it was awesome?
- The mascara’s formula is said to be like a mousse. This formula is perfect for those who are looking for more volume and length in their lashes but want to avoid the clumpy, spider-y look.
- The formula is buildable. You can wear one coat during the day
and apply 2-3 coats (or more) at night for a more dramatic look. Again,
when you build on the formula, the lashes do not get clumpy. Yay!
- When you apply 2-3 coats, the result is super soft, natural looking lashes. I adore how soft my lashes instead of stiff and clumpy.
- The brush is quite large and bendy, this helps with grabbing each lash and applying the formula on it while at the same time, separating your lashes.
A word of warning…
- As with any mascara, I would trial for at least a week or two before passing judgment. With the Maybelline Mega Plush mascara, I found that the first couple of days I used it, I saw some flakes under my eyes. But this only happened at the start, it does not flake on me anymore. I think the formula has settled within a week.
- While the large brush is great for the upper lashes, applying mascara on the bottom lashes can be quite tricky! It is difficult applying ample mascara without getting mascara on your under eyes…On an everyday basis this does not bother me as I typically do not apply mascara on my lower lashes.
Overall, this is definitely one of my favourite drug store mascaras! It will be on my repurchase list!
The photos below show my RIGHT EYE with the mascara with nothing on my left eye. My right eye has no eyeliner, only Maybelline Mega Plush mascara!
Have you tried this eyeliner? What do you think?
The photos below show my RIGHT EYE with the mascara with nothing on my left eye. My right eye has no eyeliner, only Maybelline Mega Plush mascara!
Have you tried this eyeliner? What do you think?
Saturday, August 10, 2013
Get ready with me! Casual dinner date :)
Happy Saturday everyone! Here is a look I wore on a casual dinner date the other week. I love this bright warm red lipstick! Adds a bit of glam to any look :)
Products used
Laura Mercier hydrating face primer
Makeup forever face and body foundation
Inglot face powder
Jemma Kidd bronzing powder
Sleek blush in Coral
Rimmel eyebrow pencil in dark brown
Urban Decay Eyeshadow primer potion in original
Mac e/s woodwinked, vanilla, carbon
Naked palette e/s in Naked, Buck
Bobbi Brown gel eyeliner in Black Ink
Rimmel Scandal Eyes mascara in Extreme Black
Makeup Store Lipstick in Redelicious
Products used
Laura Mercier hydrating face primer
Makeup forever face and body foundation
Inglot face powder
Jemma Kidd bronzing powder
Sleek blush in Coral
Rimmel eyebrow pencil in dark brown
Urban Decay Eyeshadow primer potion in original
Mac e/s woodwinked, vanilla, carbon
Naked palette e/s in Naked, Buck
Bobbi Brown gel eyeliner in Black Ink
Rimmel Scandal Eyes mascara in Extreme Black
Makeup Store Lipstick in Redelicious
Wednesday, July 31, 2013
Makeup for a 21st birthday: Anna
I recently did my cousin's makeup for a birthday she was attending. We went for was a natural, smokey eye look! I really loved how gorgeous and fresh faced she looked!
Products used:
- Makeup forever HD primer
- Makeup forever HD foundation
- Bobbi brown concealer
- Laura Mercier loose powder
- Makeup forever contour powder
- Illamasqua blush
- Laura Mercier highlighter
- Urban Decay Eyeshadow primer potion
- Mac e/s in woodwinked, carbon
- Naked Palette
- Bobbi Brown gel eyeliner
- Ardell lashes
- Inglot lip pencil in #27
- Gorgeous Cosmetics lipstick in velvet rose
Sunday, July 21, 2013
My updated skincare routine and review of MooGoo, Clinique, Sukin and Ella Bache!
Hi lovelies! Hope you have had an enjoyable weekend! Even though the sun is out and shining in Sydney, it is still sooo cold!! The hubs and I came back from a 40km cycle and it did not keep me warm at all!
So recently, I have been on the lookout for natural skincare products. While I absolutely adore MD Formulations and what it has done for my skin, I wanted to try some products that were natural, non-toxic, no parabens, or chemicals. Below is my updated skincare routine that I have been following for a couple of months now featuring some Australian brands!
Step 1 - Cleanse
Clinique "Take the Day Off" makeup remover.
I have been using this makeup remover for a while now and I love it. I haven't found anything that does an equal or better job so I'm definitely sticking with it! It removes my gel eyeliner, mascara (I typically use non-waterproof) and eyeshadow with ease. All I do is apply some to a cotton pad, massage and wipe off. Too easy.
MooGoo Milky Wash
I. Love. This. Cleanser. sooo much! A colleague of mine began using MooGoo and raved about how good it was so I had to try it! I bought this at my local Go Vita store (healthfood and vitamin store) and it is affordable and does the job! The cleanser is glucose and coconut based, it is quite thick and you only need a pea-size amount for your whole face. I use warm water to emulsify in my hands and then apply to my face. While it is a gentle cleanser, I find that it is very effective at removing makeup, in particular foundation, without leaving your skin dry or tight. This is perfect for winter, especially when my skin tends to feel quite dry. I also love that it does not have a strong fragrance (none at all, really). MooGoo is environmentally friendly and has pure and simple ingredients. It's also an Australian company, and has an awesome website that explains each of its ingredients in laymans terms.
Step 2 - Apply Eyecream
Sukin Antioxidant Eye Serum
I would say it's quite hard to find a good eyecream, it explains why I've been using MD Formulations for years...I bought Sukin from Priceline and I didn't really read any reviews online so I wasn't sure what to expect. My first impressions of the product, I didn't enjoy it at all. I felt that the lines under my eyes were beginning to show (it could also just have to do with my age :P). But I became more diligent in applying the eye serum, I would spend more time dabbing and applying it on my eye and use more of the serum as well. After changing my approach, the results of the eye serum were just as good as MD Formulations. The skin under my eyes is nicely hydrated. What I also love about Sukin is that it's an Australian brand, affordable and contains no parabens or the nasty stuff!
Step 3 - Moisturise
MooGoo Soothing MSM Cream
This is one of the best value and effective moisturisers. As you can see, it is a pretty massive tub of moisturising goodness. It's very gentle on the skin and has no strong fragrance. In terms of consistency, the closest I can compare it to is Sorbolene. I am really enjoying the moisturiser, it leaves my skin very supple and soft. My only complaint is that during Winter, my skin around my mouth tends to get quite dry, and I will need to apply more of the moisturiser on that area. This did not happen with MD Formulations so I would say, you will need less of MD Formulations to get the same level of moisture. But regardless, I do love this MooGoo moisturiser! It's like a never-ending tub of udder cream! hehe
Step 4 - Apply sunscreen
Ella Bache SFP 30+ Broad Spectrum Sunscreen Cream
I wear sunscreen in one form or another everyday before I leave the house. I typically use tinted moisturiser on an everyday basis but where I want more protection against the suns rays, I use this lovely sunscreen here. I bought this from David Jones and it was interesting because the sales lady from another brand really recommended I buy the Ella Bache one! And I like the formula, it is lightweight, and not super greasy (still is a teeny bit greasy but i can live with that). It also has a sunscreen smell but not an overpowering one. It applies clear on your skin and the best thing about it is that when I sweat during exercise, my beads of sweat are not milky because of the sunscreen! I definitely recommend this sunscreen if you are looking for some serious protection :)
So recently, I have been on the lookout for natural skincare products. While I absolutely adore MD Formulations and what it has done for my skin, I wanted to try some products that were natural, non-toxic, no parabens, or chemicals. Below is my updated skincare routine that I have been following for a couple of months now featuring some Australian brands!
Step 1 - Cleanse
Clinique "Take the Day Off" makeup remover.
I have been using this makeup remover for a while now and I love it. I haven't found anything that does an equal or better job so I'm definitely sticking with it! It removes my gel eyeliner, mascara (I typically use non-waterproof) and eyeshadow with ease. All I do is apply some to a cotton pad, massage and wipe off. Too easy.
MooGoo Milky Wash
I. Love. This. Cleanser. sooo much! A colleague of mine began using MooGoo and raved about how good it was so I had to try it! I bought this at my local Go Vita store (healthfood and vitamin store) and it is affordable and does the job! The cleanser is glucose and coconut based, it is quite thick and you only need a pea-size amount for your whole face. I use warm water to emulsify in my hands and then apply to my face. While it is a gentle cleanser, I find that it is very effective at removing makeup, in particular foundation, without leaving your skin dry or tight. This is perfect for winter, especially when my skin tends to feel quite dry. I also love that it does not have a strong fragrance (none at all, really). MooGoo is environmentally friendly and has pure and simple ingredients. It's also an Australian company, and has an awesome website that explains each of its ingredients in laymans terms.
Step 2 - Apply Eyecream
Sukin Antioxidant Eye Serum
I would say it's quite hard to find a good eyecream, it explains why I've been using MD Formulations for years...I bought Sukin from Priceline and I didn't really read any reviews online so I wasn't sure what to expect. My first impressions of the product, I didn't enjoy it at all. I felt that the lines under my eyes were beginning to show (it could also just have to do with my age :P). But I became more diligent in applying the eye serum, I would spend more time dabbing and applying it on my eye and use more of the serum as well. After changing my approach, the results of the eye serum were just as good as MD Formulations. The skin under my eyes is nicely hydrated. What I also love about Sukin is that it's an Australian brand, affordable and contains no parabens or the nasty stuff!
Step 3 - Moisturise
MooGoo Soothing MSM Cream
This is one of the best value and effective moisturisers. As you can see, it is a pretty massive tub of moisturising goodness. It's very gentle on the skin and has no strong fragrance. In terms of consistency, the closest I can compare it to is Sorbolene. I am really enjoying the moisturiser, it leaves my skin very supple and soft. My only complaint is that during Winter, my skin around my mouth tends to get quite dry, and I will need to apply more of the moisturiser on that area. This did not happen with MD Formulations so I would say, you will need less of MD Formulations to get the same level of moisture. But regardless, I do love this MooGoo moisturiser! It's like a never-ending tub of udder cream! hehe
Step 4 - Apply sunscreen
Ella Bache SFP 30+ Broad Spectrum Sunscreen Cream
I wear sunscreen in one form or another everyday before I leave the house. I typically use tinted moisturiser on an everyday basis but where I want more protection against the suns rays, I use this lovely sunscreen here. I bought this from David Jones and it was interesting because the sales lady from another brand really recommended I buy the Ella Bache one! And I like the formula, it is lightweight, and not super greasy (still is a teeny bit greasy but i can live with that). It also has a sunscreen smell but not an overpowering one. It applies clear on your skin and the best thing about it is that when I sweat during exercise, my beads of sweat are not milky because of the sunscreen! I definitely recommend this sunscreen if you are looking for some serious protection :)
Saturday, June 1, 2013
Get Ready with Me! Makeup for an evening wedding
Hello lovelies :) Hope you are all having a nice weekend!
I have another get ready with me video, this time for an evening wedding. It is officially the first day of Winter and the days are getting shorter in Sydney so the lighting could have been better!
While I love applying makeup for nights out, weddings and work, I am trying to give my skin and face a break from makeup on the weekends. So on days where I am just chilling at home or running errands, I don't apply any makeup! I used to not be able to feel comfortable wearing a bare face in public but now I feel very comfortable in my skin.
Let me know what you guys think!
Sunday, May 19, 2013
Get Ready With Me! Makeup for a daytime wedding
It's been awhile since I've done a "get ready with me" video so here is one for you today! We attended a wedding yesterday and I wanted to share what makeup look I wore ;) The ceremony was in the morning so I opted for natural makeup with some colour on the lips. This is probably one of my go-to looks!
Let me know what you think of the video!
Wednesday, February 27, 2013
Review! Revlon ColorStay Ultimate Suede lipsticks
L-R: Finale 095 and Backstage 035
Hi lovelies! Today I'm reviewing the Revlon ColorStay Ultimate Suede lipsticks in the colours Finale 095 and Backstage 035.
These are longwear lipsticks designed to stay put for 16 hours even after meals while keeping your lips hydrated and smooth with moisturising ingredients including aloe and shea butter.
I generally wear creamy lipsticks because they are moisturising and don't dry my lips out. Although creamy lipsticks don't stay on my lips for very long, there is always touch ups after eating, etc. I was interested in the long wear lipsticks but I hadn't found one that was comfortable on my lips (some of them felt like a plastic cling wrap on my lips...), or any hydrating ones.
Cue Revlon ColorStay Ultimate Suede. I was impressed with the long-lasting colour and moisturised feeling of my lips. This is how I applied it:
1) Start with hydrated lips. Always! I use Lucas Paw Paw ointment but you only need a touch. I found that if I put too much, the lipstick wouldn't stay on my lips very well and it would streak.
2) Apply the lipstick. It felt very smooth and velvety when I was applying the colour.
3) In a few minutes, the lipstick would start to get sticky - this is expected. The lipstick if working to stay put on your lips!
4) Once the tacky feeling of the lipstick is gone, your lips are now good to go! You can eat, drink and kiss without losing much of the colour! Fabulous!
Pros!
* The lipstick felt very smooth and hydrating when first applied
* Once the lipstick settled, my lips didn't feel dry. After a few hours when I felt my lips need a bit more hydration, I would either dab some Lucas Paw Paw Ointment or reapply the lipstick.
* When the lipstick had "set" on my lips, the colour is still pretty vivid and the colour does not transfer when you kiss someone or when you eat!
* I loved the colour Finale 095 - the perfect red!
* The product didn't smell which is exactly what I like!
* The packaging is simple and practical, the lid is clear so you can see exactly what colour the lipstick is.
Cons!
* When closely inspecting my lips after the lipstick had settled, I could see the lines/wrinkles on my lips.
My overall rating is 4 out of 5 stars! I thought the lipstick performed pretty well for a long-wear lippie! And I would definitely consider purchasing in other colours :)
Have you tried this lipstick? Let me know what your thoughts are if you have! Or let me know what are you favourite long-wear lippies?
Thank you beautyheaven for providing these products to trial and review!
Hi lovelies! Today I'm reviewing the Revlon ColorStay Ultimate Suede lipsticks in the colours Finale 095 and Backstage 035.
These are longwear lipsticks designed to stay put for 16 hours even after meals while keeping your lips hydrated and smooth with moisturising ingredients including aloe and shea butter.
I generally wear creamy lipsticks because they are moisturising and don't dry my lips out. Although creamy lipsticks don't stay on my lips for very long, there is always touch ups after eating, etc. I was interested in the long wear lipsticks but I hadn't found one that was comfortable on my lips (some of them felt like a plastic cling wrap on my lips...), or any hydrating ones.
Cue Revlon ColorStay Ultimate Suede. I was impressed with the long-lasting colour and moisturised feeling of my lips. This is how I applied it:
1) Start with hydrated lips. Always! I use Lucas Paw Paw ointment but you only need a touch. I found that if I put too much, the lipstick wouldn't stay on my lips very well and it would streak.
2) Apply the lipstick. It felt very smooth and velvety when I was applying the colour.
3) In a few minutes, the lipstick would start to get sticky - this is expected. The lipstick if working to stay put on your lips!
4) Once the tacky feeling of the lipstick is gone, your lips are now good to go! You can eat, drink and kiss without losing much of the colour! Fabulous!
Pros!
* The lipstick felt very smooth and hydrating when first applied
* Once the lipstick settled, my lips didn't feel dry. After a few hours when I felt my lips need a bit more hydration, I would either dab some Lucas Paw Paw Ointment or reapply the lipstick.
* When the lipstick had "set" on my lips, the colour is still pretty vivid and the colour does not transfer when you kiss someone or when you eat!
* I loved the colour Finale 095 - the perfect red!
* The product didn't smell which is exactly what I like!
* The packaging is simple and practical, the lid is clear so you can see exactly what colour the lipstick is.
Cons!
* When closely inspecting my lips after the lipstick had settled, I could see the lines/wrinkles on my lips.
My overall rating is 4 out of 5 stars! I thought the lipstick performed pretty well for a long-wear lippie! And I would definitely consider purchasing in other colours :)
Have you tried this lipstick? Let me know what your thoughts are if you have! Or let me know what are you favourite long-wear lippies?
Thank you beautyheaven for providing these products to trial and review!
Tuesday, February 12, 2013
FOTD! Everyday bronzy summer makeup
I was filming a "get ready with me" video and it wasn't until I replayed the footage that I realised it wasn't focused on me at all, i.e. blurry as!! I was so upset!! I didn't want to let this look 'go to waste' so here are the photos and the makeup I used :)
My everyday bronzy summer makeup:
- MUFE face and body foundation in #34
- Garnier roll on concealer
- Inglot face powder in #66
- Jemma Kidd bronzer
- Illamasqua blush in Hussy
- Rimmel eyebrow pencil in Black brown
- Bobbi brown gel eyeliner in Black (oops! not in the photo above)
- Gorgeous cosmetics lipstick in velvet rose
- Rimmel mascara scandaleyes
- L'oreal eyeliner
- Mac e/s in woodwinked, texture, embark
- Inglot e/s in #459
Hope you are enjoying your week! :)
Monday, January 28, 2013
FOTD! Wedding Guest makeup
Yesterday, two of my beautiful friend's were wed! They had a beautiful Hindu-Jewish wedding and I felt so blessed to be a part of it!
I wanted to share my FOTD with you guys! I went for very simple makeup with thick eyeliner and lashes and a pop of colour on my lips - this look is fail safe!! I also swept my hair to one side and curled the ends.
Hope you guys are enjoying your Australia Day long weekend!
I wanted to share my FOTD with you guys! I went for very simple makeup with thick eyeliner and lashes and a pop of colour on my lips - this look is fail safe!! I also swept my hair to one side and curled the ends.
Hope you guys are enjoying your Australia Day long weekend!
Sunday, December 9, 2012
Haul! Black Friday sales :)
Who doesn't love a good sale? I've noticed that the retailers have been spoiling customers with a few (many?) sales leading up to Christmas! Yay! The items I mention below are a mix of Black Friday online sales and pre-Christmas sales. I have always been a lover of spending my days (window) shopping at the mall but recently, shopping online while sprawled out on my couch drinking my latte also has its benefits...
Hope you guys enjoy the video! What are your favourite pre-Christmas and Boxing day sales?
Dresses - Asos. Love love love! I am super excited to wear these to weddings and other special occasions :)
Shorts and dress from Sabo Skirt. I love the cute print and the dress is soo simple yet so pretty and feminine :)
Lace peplum top - Glassons. What's not to love. My favourite top everrrr!
Flats - Witchery. I am in love with these flats and have worn them to death (already).
Makeup goodies from Priceline and Skincarestore - Skindinavia makeup finishing spray from Skincarestore and the rest from Priceline :) I actually picked up the wrong mascara but oh wells. Still works amazing :)
Close up of the Maybelline Colour Tattoo in Pomegranate Punk. Loooove this colour (it's what I'm wearing in the video)
Hope you guys enjoy the video! What are your favourite pre-Christmas and Boxing day sales?
Dresses - Asos. Love love love! I am super excited to wear these to weddings and other special occasions :)
Shorts and dress from Sabo Skirt. I love the cute print and the dress is soo simple yet so pretty and feminine :)
Lace peplum top - Glassons. What's not to love. My favourite top everrrr!
Flats - Witchery. I am in love with these flats and have worn them to death (already).
Makeup goodies from Priceline and Skincarestore - Skindinavia makeup finishing spray from Skincarestore and the rest from Priceline :) I actually picked up the wrong mascara but oh wells. Still works amazing :)
Close up of the Maybelline Colour Tattoo in Pomegranate Punk. Loooove this colour (it's what I'm wearing in the video)
Wednesday, November 28, 2012
Tutorial! Super easy party makeup!
I am really excited for Christmas and New Years for so many reasons. Long summer days, hanging out with family and friends, the outdoors, and the general happy spirit everyone seems to be in! It is also one of the most busiest times of the year, how is a girl supposed to squeeze in shopping when there is work to be done, parties to attend and drinks to be drunk?
So to maximise the time spent enjoying the silly season without comprising on your looks, I have a quick and super easy smokey eye look that is very wearable day or night - I know this will become my "go-to" party look!
Let me know what you think and what your favourite PARTY looks are :)
Products used in video:
- Naked palette
- Mac paintpoint in "Constructivist"
- Bobbi Brown long-wear gel eyeliner in "Black Ink"
- Benefit Mascara "They're Real" (my fav!!)
- Revlon Lip Butter in Cotton Candy
So to maximise the time spent enjoying the silly season without comprising on your looks, I have a quick and super easy smokey eye look that is very wearable day or night - I know this will become my "go-to" party look!
Let me know what you think and what your favourite PARTY looks are :)
Products used in video:
- Naked palette
- Mac paintpoint in "Constructivist"
- Bobbi Brown long-wear gel eyeliner in "Black Ink"
- Benefit Mascara "They're Real" (my fav!!)
- Revlon Lip Butter in Cotton Candy
Sunday, November 25, 2012
Makeup for special occasions :)
Hope you all had an amazing weekend! I absolutely loved the weather! Hello Summer, about time!
Today I wanted to share special occasion makeup looks that I did yesterday. My dragon boat buddy (Yuen) and her friend (Alex) wanted their makeup done for a birthday party on Saturday night. Here are the before and afters. I only resized and cropped the images below, no photoshopping!
Both gorgeous girls!! :)
Today I wanted to share special occasion makeup looks that I did yesterday. My dragon boat buddy (Yuen) and her friend (Alex) wanted their makeup done for a birthday party on Saturday night. Here are the before and afters. I only resized and cropped the images below, no photoshopping!
Both gorgeous girls!! :)
Monday, November 12, 2012
Makeup for Pre-Wedding Photoshoot: Michelle
Happy Monday all :) I did the makeup and hair for Michelle for a pre-wedding shoot in the Blue Mountains. Unfortunately I forgot to take a before photo (she's so beautiful without makeup) but here is the finished look. I was going for a very simple makeup look, just accentuating her eyes. These are untouched photos from my dslr in their hotel room, hoping to receive some of the photos from the shoot soon.
Wednesday, October 31, 2012
Review! Rimmel BB Cream
Do you take your skincare seriously? I do :) I think if you work on 'perfecting' your skin, you can get away with a simple eyeliner and a lipgloss...This is where BB creams come in...the Rimmel BB Cream boasts 9 benefits in the 1 product including: primes, moisturises, minimises pores, conceals, covers, smoothes, mattifies, brightens and helps protect. I was excited to try this product because at only $12.95 for a 30ml bottle and with 4 shades to choose from, this could be a cheaper alternative to my current tinted moisturiser (by the Balm).
Initial thoughts?
The shade I had was medium which is a touch too light for my complexion. The consistency of the product was also very thick and creamy which I wasn’t really used to. The overall finish of the product was matte especially on my cheeks and forehead – I probably applied to much around my nose as it started looking cakey even before the powder was applied. On the first day of application, I thought the product looked ok on my skin.
Best way to apply?
On my very first application, I used my hands and massaged the product onto my skin. This helped warm the product out for easy blending. I also tried a flat foundation brush but was left with streaks across my face. Not hot. Lastly I tried a flat top synthetic kabuki brush by Sigma (F80) and it worked like a dream (i.e., better than my hand application)! Took a while for me to figure out how to make this product work for me - I'm glad I tried the kabuki brush cos it really affects the overall finish of the product on my face (and the star rating of the product hehe)!
The product also set very quickly so I would apply it in small areas of my face, i.e. right cheek, left cheek, chin and neck, nose, then lastly, the forehead.
Note: the end of the video below includes a demo of how I applied the product :)
Pros
* Great coverage
* Matte finish (even without powder it is quite matte!)
* SPF 25!!
* Smells nice
* Natural, good finish
* Inexpensive! $12.95 a tube!
* Stays put for the whole day, although my T-zone got a bit oily by the end of the day with no touch ups.
Cons
* Quite creamy - this can affect how you choose to apply the product
* Sets quickly - need to work quickly
* If I use a flat top kabuki brush to apply the product which in my opinion is the best method, it will inevitably use up more of the product than if I used my hands
* When I used too much of the product (particularly around my nose), it would get quite "cakey" and highlight my flakey or pores on my nose >.<
Overall Rating
I enjoyed this product once I figured out how to use it and if I ever decide to repurchase, I would probably go a shade darker (this might alleviate the cakey/flakey problem above). My overall rating is 3.5 stars out of 5 stars. Given the price point and the accessibility, this BB cream does not perform too bad at all!
Please see my review of the L'oreal Nude Magique BB cream for a comparison.
Let me know what you thought of the Rimmel BB cream!
It is really hard doing selfies on timer!! >.<
Initial thoughts?
The shade I had was medium which is a touch too light for my complexion. The consistency of the product was also very thick and creamy which I wasn’t really used to. The overall finish of the product was matte especially on my cheeks and forehead – I probably applied to much around my nose as it started looking cakey even before the powder was applied. On the first day of application, I thought the product looked ok on my skin.
Best way to apply?
On my very first application, I used my hands and massaged the product onto my skin. This helped warm the product out for easy blending. I also tried a flat foundation brush but was left with streaks across my face. Not hot. Lastly I tried a flat top synthetic kabuki brush by Sigma (F80) and it worked like a dream (i.e., better than my hand application)! Took a while for me to figure out how to make this product work for me - I'm glad I tried the kabuki brush cos it really affects the overall finish of the product on my face (and the star rating of the product hehe)!
The product also set very quickly so I would apply it in small areas of my face, i.e. right cheek, left cheek, chin and neck, nose, then lastly, the forehead.
Note: the end of the video below includes a demo of how I applied the product :)
Pros
* Great coverage
* Matte finish (even without powder it is quite matte!)
* SPF 25!!
* Smells nice
* Natural, good finish
* Inexpensive! $12.95 a tube!
* Stays put for the whole day, although my T-zone got a bit oily by the end of the day with no touch ups.
Cons
* Quite creamy - this can affect how you choose to apply the product
* Sets quickly - need to work quickly
* If I use a flat top kabuki brush to apply the product which in my opinion is the best method, it will inevitably use up more of the product than if I used my hands
* When I used too much of the product (particularly around my nose), it would get quite "cakey" and highlight my flakey or pores on my nose >.<
Overall Rating
I enjoyed this product once I figured out how to use it and if I ever decide to repurchase, I would probably go a shade darker (this might alleviate the cakey/flakey problem above). My overall rating is 3.5 stars out of 5 stars. Given the price point and the accessibility, this BB cream does not perform too bad at all!
Please see my review of the L'oreal Nude Magique BB cream for a comparison.
Let me know what you thought of the Rimmel BB cream!
Tuesday, October 23, 2012
Makeup and Hair: Natural look for special occasions
It's not often I get the opportunity to doll up my sisters! So when my little sister mentioned she was going to a 21st birthday on the same day that she would be over at my house, I suggested I do her hair and makeup! For the makeup, she wanted a natural look with soft brown colours. She almost always has her hair parted in the middle with loose curls. So for the hair, I wanted to give her a polished look while at the same time still keeping those loose curls.
Let me know what you think :)
For the final look, she wanted her fringe down rather than pulled back which is shown in the last photo :)
Let me know what you think :)
For the final look, she wanted her fringe down rather than pulled back which is shown in the last photo :)
Friday, October 19, 2012
Priceline beauty haul!
Hi beauties :) I have a mini priceline haul to show you guys! Currently, there are some pretty good deals on offer for specific brands so I do recommend going in-store to check it out. Have you guys seen the new Priceline website? You can also purchase the products and check out what's on sale on their website.
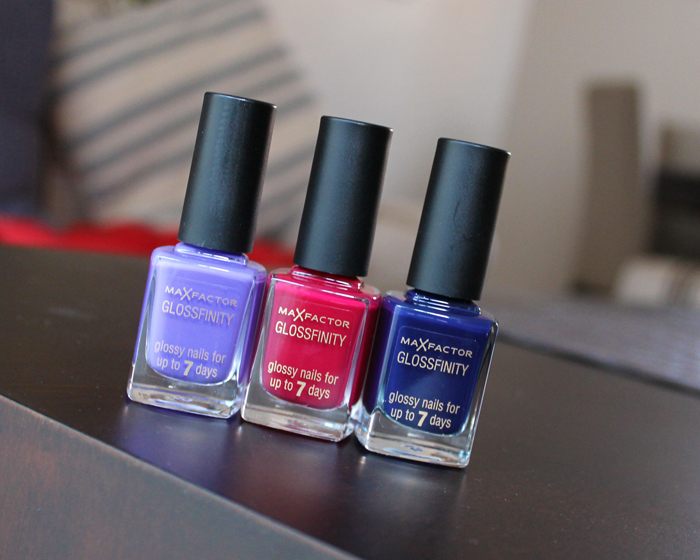
I fell in love with all these colours (L-R: Lilac Lace, Burgundy Crush, Royal Blue)! These were only about $5-$6 per bottle! I will do some swatches of these colours on my nails as I paint them on. I've tried the burgundy crush colour and it's darker on my nails than how it looks in the bottle - it is actually a plum-wine-red. Love it! Only one fault - it has chipped on one nail and its only the second day of wear :(
Love these colours!! The two Rimmel lipsticks (Asia and Vintage Pink) was buy 1 get one free and the Max Factor (Maroon Dust) was $7 off :)
My brief thoughts on the lipsticks - I love the colours, especially maroon dust! The textures of all the lipsticks are very creamy and moisturising which is the type of lipstick I prefer :) Very happy with these purchases!!
I fell in love with all these colours (L-R: Lilac Lace, Burgundy Crush, Royal Blue)! These were only about $5-$6 per bottle! I will do some swatches of these colours on my nails as I paint them on. I've tried the burgundy crush colour and it's darker on my nails than how it looks in the bottle - it is actually a plum-wine-red. Love it! Only one fault - it has chipped on one nail and its only the second day of wear :(
My brief thoughts on the lipsticks - I love the colours, especially maroon dust! The textures of all the lipsticks are very creamy and moisturising which is the type of lipstick I prefer :) Very happy with these purchases!!
Sunday, October 14, 2012
Bridal makeup trial! Divya
I was excited to do Divya's bridal makeup trial because she has pretty facial features :) Here is a before and after shot of the trial.
She will be wearing this look to her wedding reception. I wanted to go for a glamourous feel with neutral smokey eyes and she wanted a colourful lip!
Please let me know what you think!
She will be wearing this look to her wedding reception. I wanted to go for a glamourous feel with neutral smokey eyes and she wanted a colourful lip!
Please let me know what you think!
Subscribe to:
Posts (Atom)